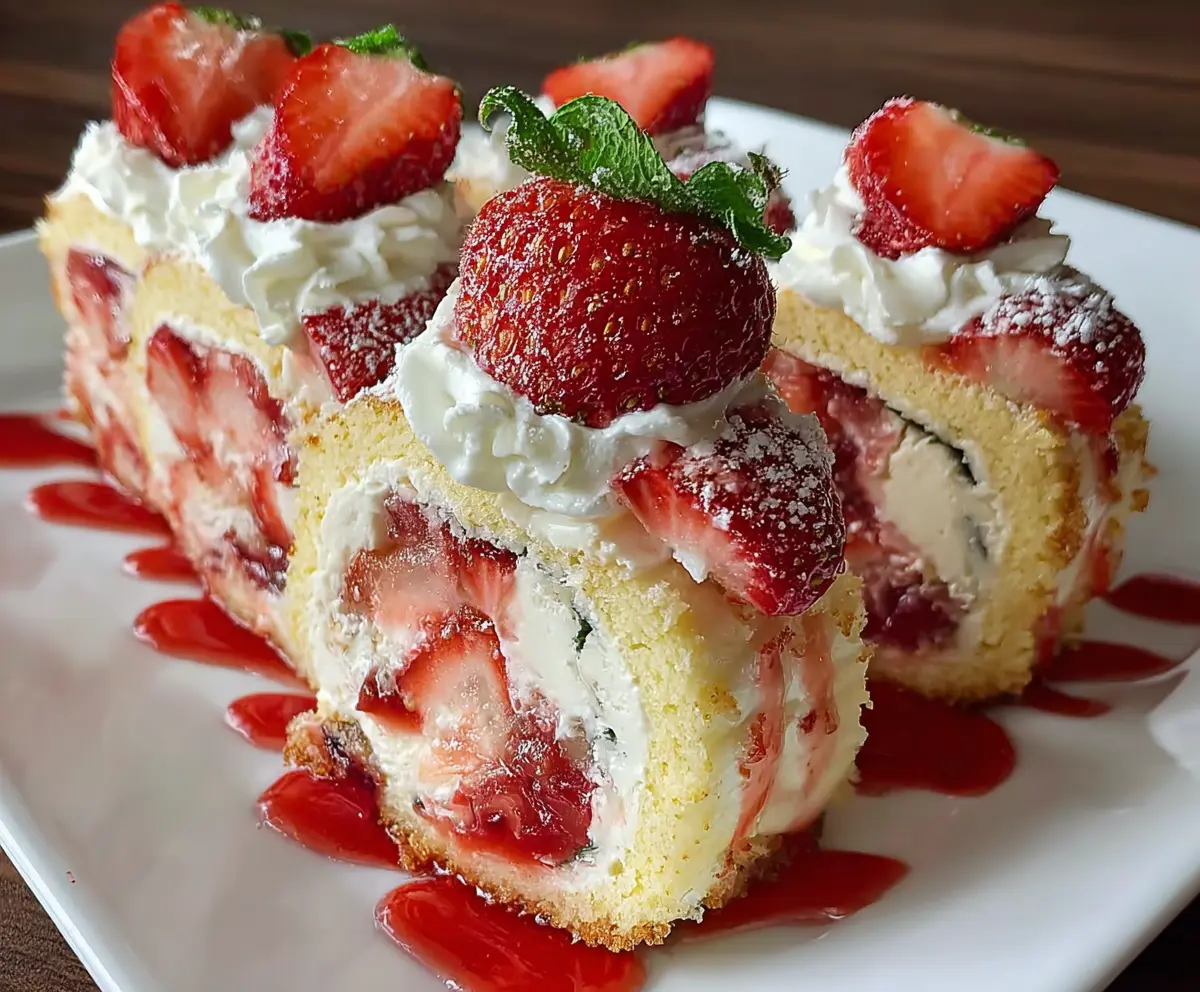
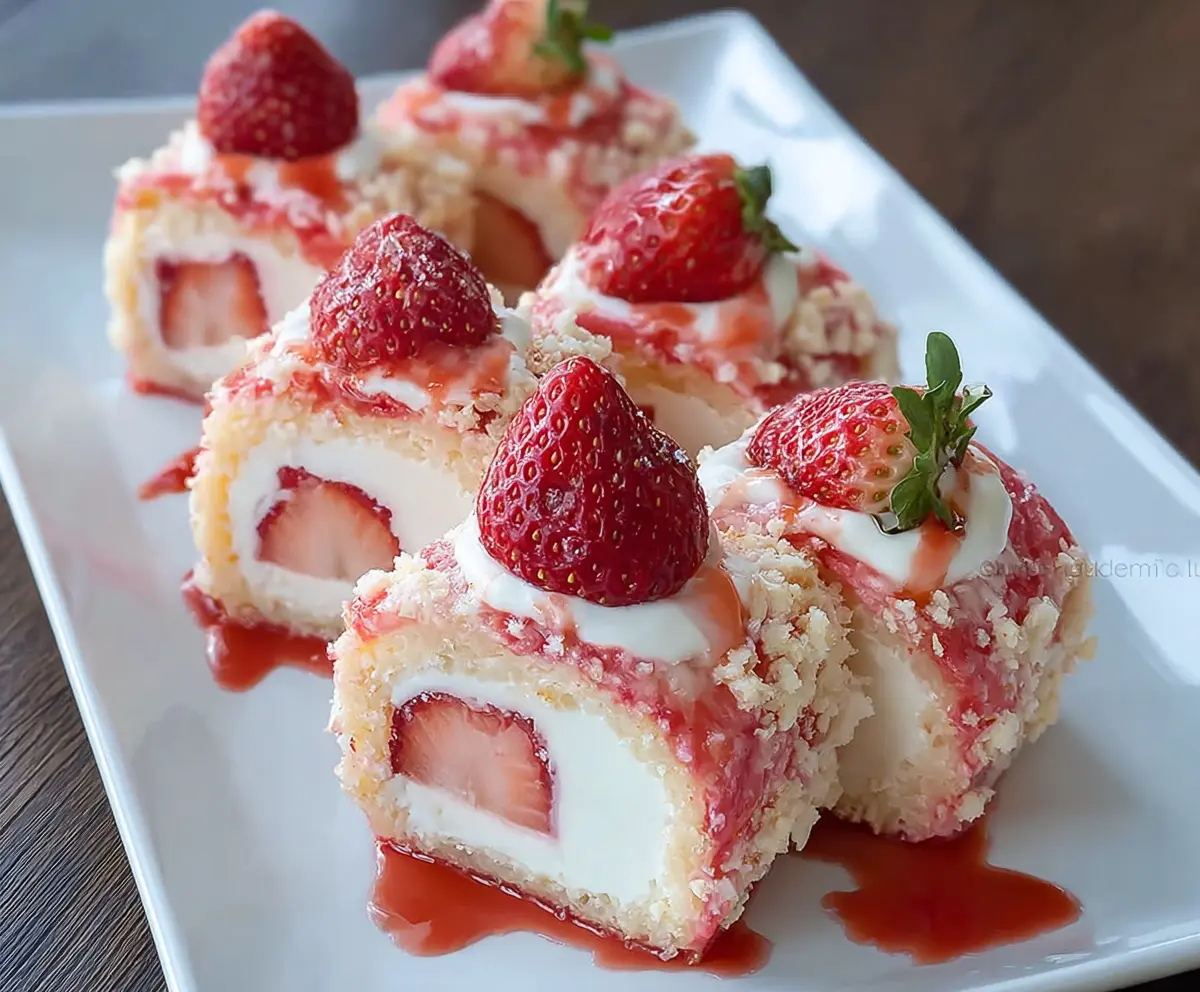
Strawberry Shortcake Cheesecake Sushi Rolls are a fun and fresh twist on two classic treats. Imagine creamy cheesecake, sweet strawberries, and soft cake all rolled up like sushi—it’s like dessert met a playful sushi roll and they instantly became best friends. The combination of textures, from the spongy cake to the smooth cheesecake and juicy strawberries, makes every bite exciting and tasty.
I love making these rolls when I want to surprise guests with something different but still super comforting. They’re easy to slice and share, and I find that the cheesecake filling holds everything together just right without being too heavy. One little tip I’ve learned is to chill the rolls before slicing—it helps keep the shape perfect and the layers neat.
These sweet sushi rolls are a great way to bring a smile to any table, especially during spring or summer when fresh strawberries are at their best. I usually serve them with a drizzle of strawberry sauce or a dusting of powdered sugar to keep things simple but extra delicious. Plus, they’re a neat treat to make with kids—rolling and slicing is half the fun!
Key Ingredients & Substitutions
Eggs: These help make the sponge cake light and fluffy. Make sure they’re at room temperature for better volume when whipped.
Sponge cake flour mix: Using all-purpose flour with cornstarch makes the cake tender. If you want gluten-free, try a gluten-free flour blend but expect slight texture change.
Cream cheese: Softened cream cheese is important for smooth cheesecake filling. You can swap with mascarpone for a richer taste.
Heavy cream: Whip it to stiff peaks to get that fluffy filling. Non-dairy creams can work but might not hold as well.
Strawberries: Fresh, ripe strawberries give natural sweetness and color. Try blueberries or raspberries if strawberries aren’t in season.
Vanilla extract: Adds lovely aroma to both cake and filling. If you don’t have vanilla, a bit of almond extract can be interesting but use less as it’s stronger.
How Do You Roll the Sponge Cake Without Cracking?
Rolling the sponge cake while it’s warm avoids cracks and helps form the roll shape easily.
- After baking, immediately invert onto a sugared towel to prevent sticking.
- Peel off parchment gently and roll it up with the towel inside. This “rests” the cake and trains it to roll smoothly.
- Cool completely in this rolled shape before unrolling to add filling.
- When adding filling, roll tightly but gently to keep shape without breaks.
This simple trick keeps your cake soft and neat, making the sushi rolls look great!
Equipment You’ll Need
- 15×10-inch jelly roll pan – I recommend this size because it creates a thin, even sponge cake perfect for rolling.
- Parchment paper – makes removing the cake easy and prevents sticking during baking.
- Electric mixer – helps whip eggs and cream quickly to get that airy texture.
- Mixing bowls – for mixing cake ingredients, filling, and sauce.
- Spatula or rubber scraper – gentle folding of dry ingredients keeps the batter light.
- Kitchen towel – for rolling and cooling the cake to help it keep its shape.
- Strainer (optional) – for smooth strawberry sauce if you prefer no chunks.
- Refrigerator – essential for chilling the rolls and setting the filling.
Flavor Variations & Add-Ins
- Swap strawberries with blueberries or raspberries for a different berry twist that pairs well with the cheesecake.
- Add a splash of liqueur like Grand Marnier or Amaretto to the strawberry sauce for extra flavor.
- Mix in chopped hazelnuts or almonds into the cheesecake filling for crunch and nuttiness.
- Use lemon zest or a little lemon juice in the strawberry sauce to add a fresh, tangy note.
Strawberry Shortcake Cheesecake Sushi Rolls
Ingredients You’ll Need:
For the sponge cake roll:
- 4 large eggs
- 3/4 cup granulated sugar
- 1 cup all-purpose flour
- 1/4 cup cornstarch
- 1 tsp baking powder
- 1/4 tsp salt
- 1 tsp vanilla extract
For the cheesecake filling:
- 8 oz (225 g) cream cheese, softened
- 1/2 cup powdered sugar
- 1 tsp vanilla extract
- 1 cup heavy cream
For the strawberry sauce:
- 1 quart fresh strawberries, hulled (reserve some whole for garnish)
- 1/2 cup granulated sugar
- 2 tbsp lemon juice
- 1 tbsp water (if needed)
For assembly and decoration:
- Fresh strawberries, sliced
- Whipped cream for topping
- Powdered sugar for dusting
- Fresh mint leaves (optional)
How Much Time Will You Need?
This recipe takes about 25 minutes to prepare the cake and filling, 15 minutes to cook the strawberry sauce, plus 12-15 minutes baking time. Allow an additional hour for chilling the rolled cake before slicing and serving. Overall, plan about 2 hours from start to finish including cooling and setting time.
Step-by-Step Instructions:
1. Prepare the sponge cake:
Preheat your oven to 350°F (175°C). Line a 15×10-inch jelly roll pan with parchment paper and lightly grease it. Using an electric mixer, beat the eggs with the granulated sugar in a large bowl for about 5-7 minutes until the mixture is light, fluffy, and has tripled in volume.
In another bowl, sift together the flour, cornstarch, baking powder, and salt. Gently fold the dry ingredients into the egg mixture with the vanilla extract, taking care to keep the batter airy. Pour the batter evenly into the pan and smooth the surface.
Bake for 12-15 minutes until the cake springs back lightly when touched. Remove from the oven, invert the cake onto a clean kitchen towel coated lightly with powdered sugar, peel off the parchment paper, and roll the cake up in the towel gently. Let it cool completely while rolled.
2. Make the cheesecake filling:
In a mixing bowl, beat the softened cream cheese, powdered sugar, and vanilla extract together until smooth. In a separate bowl, whip the heavy cream until stiff peaks form. Carefully fold the whipped cream into the cream cheese mixture until fully combined and fluffy. Refrigerate until needed.
3. Prepare the strawberry sauce:
Chop the strawberries and place them in a saucepan with the sugar and lemon juice. Cook over medium heat, stirring frequently, until the strawberries break down and the sauce thickens (about 10-15 minutes). If the sauce becomes too thick, add a little water to reach a drizzle consistency.
Let the sauce cool before straining it for a smooth finish or leave it chunky if you prefer. Set aside.
4. Assemble the rolls:
Carefully unroll the cooled sponge cake. Spread an even layer of the cheesecake filling over the surface. Arrange the sliced strawberries evenly on top of the filling. Roll the cake back up tightly without the towel, using the towel edge to help if needed.
Wrap the roll in plastic wrap and refrigerate for at least 1 hour to allow it to set.
5. Serve and enjoy:
Slice the rolled cake into pieces about 1.5 to 2 inches thick, like sushi rolls. Arrange on serving plates, topping each slice with dollops of whipped cream, a halved or whole strawberry, and a fresh mint leaf if you like. Drizzle with the strawberry sauce and dust lightly with powdered sugar for a beautiful, sweet finish.
Can I Use Frozen Strawberries for the Sauce?
Yes, you can use frozen strawberries, but make sure to thaw them completely and drain any excess liquid before cooking. This prevents the sauce from becoming too watery.
How Do I Store Leftover Sushi Rolls?
Store the rolls wrapped tightly in plastic wrap or in an airtight container in the refrigerator for up to 2 days. Slice just before serving for the best texture.
Can I Make the Sponge Cake Ahead of Time?
Absolutely! You can bake the sponge cake up to one day in advance. Keep it rolled in the sugared towel wrapped in plastic wrap to maintain moisture until ready to assemble.
What Can I Use Instead of Heavy Cream?
If you don’t have heavy cream, you can use whipping cream or chilled coconut cream as a dairy-free alternative. Keep in mind the texture and flavor might be slightly different.