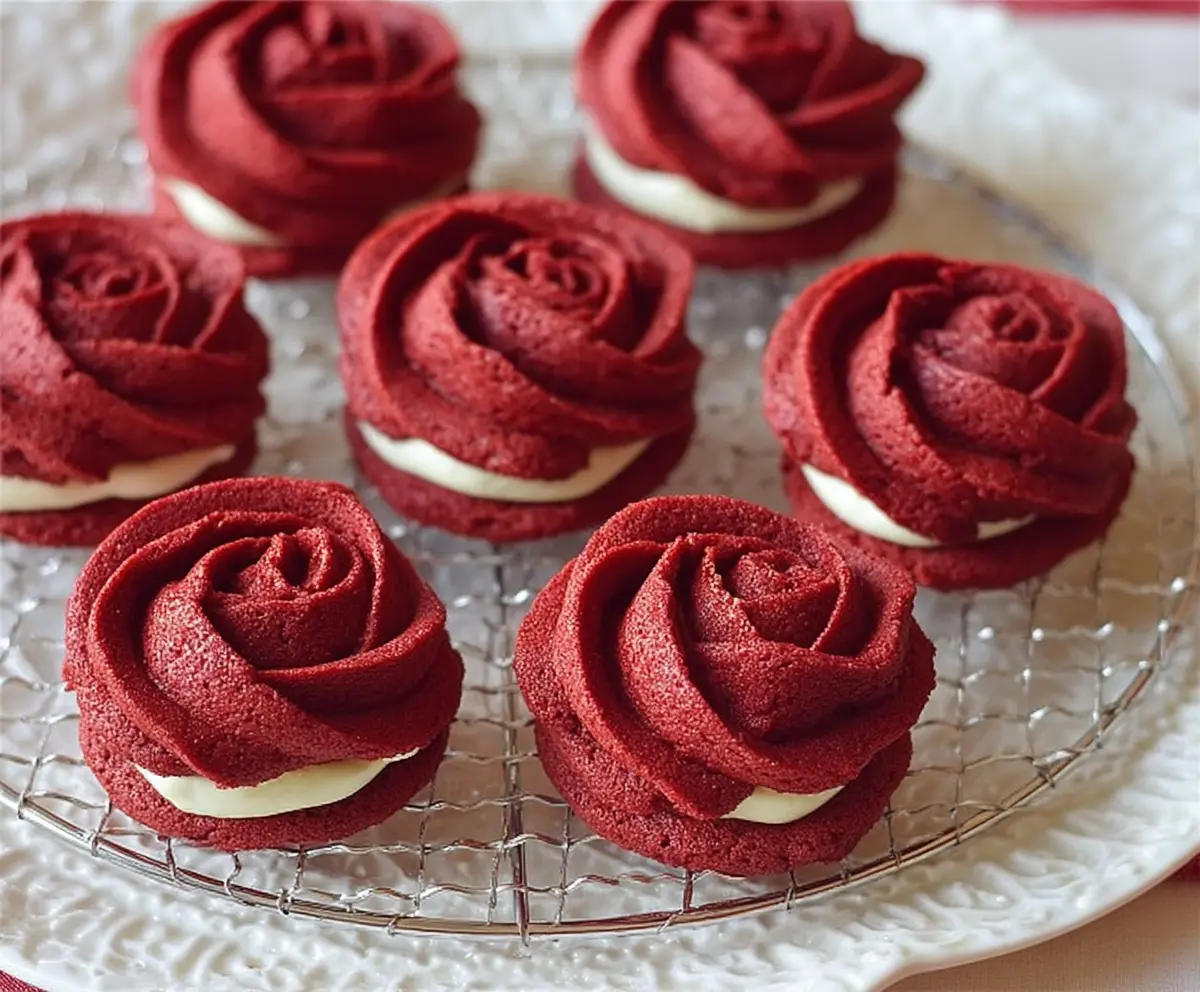
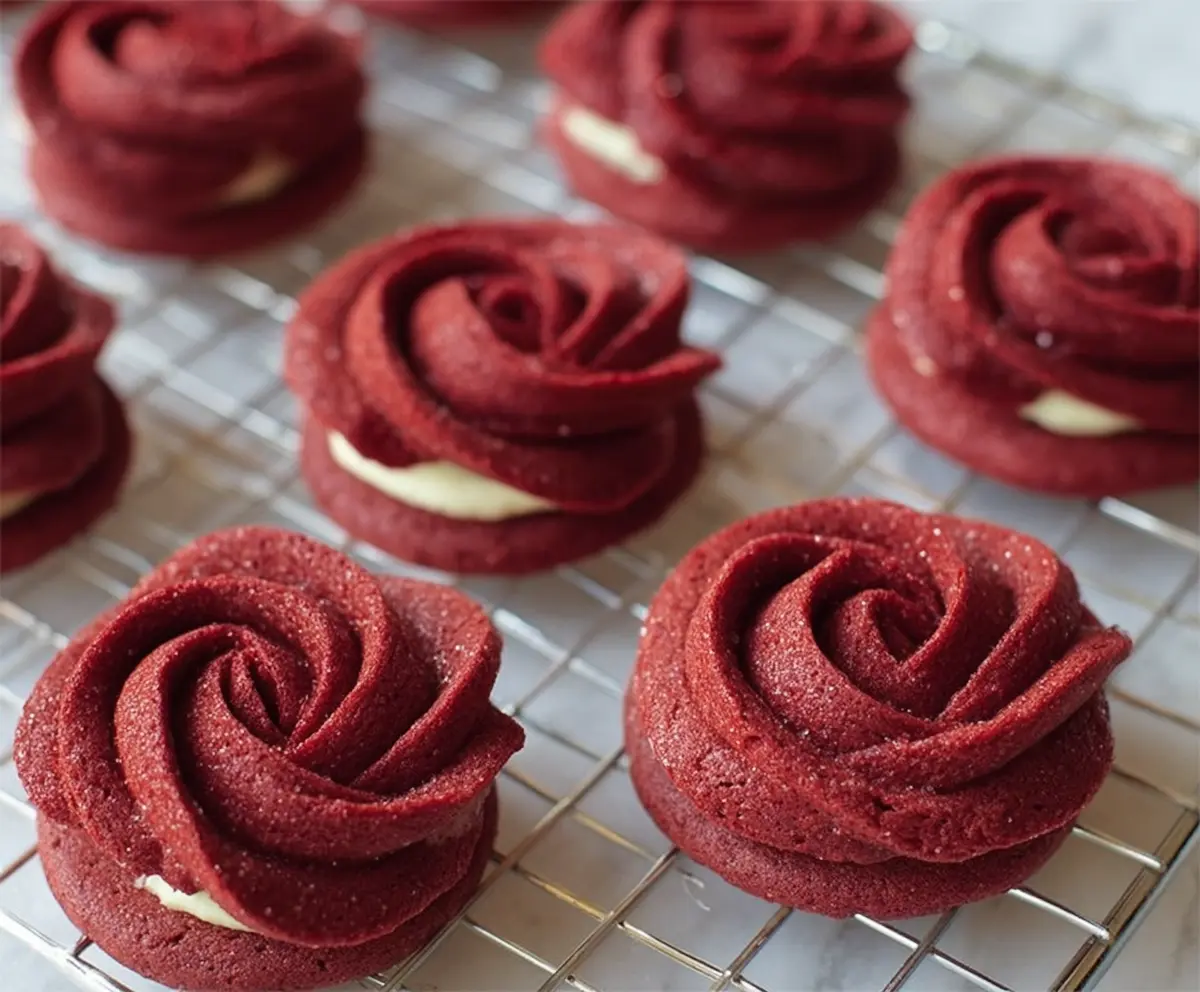
Red Velvet Rose Sandwich Cookies are a delightful treat that brings together the rich, chocolaty goodness of red velvet cake with a creamy filling all wrapped up in a charming rose shape. These cookies are soft yet slightly crisp on the edges, with a smooth, sweet cream cheese or buttercream center that makes every bite feel special. The beautiful red color and delicate rose design make them perfect for parties or a fancy afternoon snack.
I love making these cookies when I want to impress friends or just treat myself to something a bit different. The rose shape feels fancy but is actually pretty fun to create, and the filling can be customized with flavors you like, such as vanilla or a hint of citrus. One tip I’ve found helpful is to chill the dough before shaping so it holds its form better and bakes evenly.
These sandwich cookies are great for sharing with family and friends, especially around holidays or celebrations since they look almost too pretty to eat. I usually enjoy them with a cup of tea or coffee, and it’s always a joy to watch everyone’s faces light up when they bite into that creamy center. Baking and sharing these cookies has become one of my favorite ways to spread a little happiness.
Key Ingredients & Substitutions
Flour and Cocoa Powder: All-purpose flour gives structure, while unsweetened cocoa adds that subtle chocolate note. For gluten-free baking, try a 1-to-1 gluten-free flour blend. Dutch-process cocoa can work too, just reduce baking soda if your recipe uses it (this one uses baking powder, so no change needed).
Butter and Sugar: I use unsalted butter for control over saltiness, but salted is okay if you skip extra salt. Granulated sugar helps give the cookies a slight crisp edge. You can swap part of it with brown sugar for a moister cookie with a hint of caramel flavor.
Egg, Vanilla, and Buttermilk: The egg binds the dough and adds richness. Vanilla extract deepens flavor, and buttermilk adds tenderness and slight tang. If you don’t have buttermilk, mix 1 tablespoon lemon juice or vinegar with enough milk to make 1 cup, then use 1 tablespoon of this mix for the recipe.
Red Food Coloring: Gel or liquid both work, but gels give a more intense color without adding extra liquid. Natural beet juice powder can be a substitute for a natural red hue but expect a milder color.
Cream Cheese Filling: Cream cheese and butter together create a smooth, tangy filling. Make sure both are softened to blend well. If you want dairy-free, try vegan cream cheese and plant-based butter substitutes.
How Can I Perfectly Pipe the Rose Shape for These Cookies?
Piping the rose shape is the key to making these cookies look special but it’s easier than it looks! Here’s how to do it:
- Use a piping bag with a large closed star tip (like Wilton 2D or Ateco 865). This tip creates delicate “petals.”
- Fill your bag with chilled dough for better control and less spreading in the oven.
- Start piping in the center of each cookie, slowly swirling outward in a circle to form the rose petals.
- Keep your hand steady and pipe with even pressure for consistent petal size and shape.
- If you’re new to piping, practice on parchment paper first to get a feel for the motion.
- Chill the shaped cookies for 10-15 minutes before baking to help them hold their shape.
This careful shaping and chilling step keeps your roses defined and beautiful after baking.
Equipment You’ll Need
- Piping bag with a large closed-star tip (like Wilton 2D or Ateco 865) – I love this because it helps create the beautiful rose shape easily.
- Mixing bowls – for whisking dry ingredients and preparing the frosting.
- Electric mixer or beaters – makes beating the butter, sugar, and cream cheese smooth and fluffy.
- Silicone baking mat or parchment paper – prevents cookies from sticking and ensures even baking.
- Cooling rack – helps the cookies cool completely before filling so they keep their shape.
Flavor Variations & Add-Ins
- Chocolate chips or chopped nuts in the dough – add texture and extra flavor, great for a crunchy twist.
- Use lemon or orange zest in the cream cheese filling – adds a fresh citrus flavor that pairs nicely with red velvet.
- Swap the cream cheese filling for vanilla buttercream – for a sweeter, milder taste.
- Incorporate peppermint essence or crushed peppermint candies in the filling – perfect for a holiday treat.
Red Velvet Rose Sandwich Cookies
Ingredients You’ll Need:
For the Red Velvet Rose Cookies:
- 1 1/4 cups (150g) all-purpose flour
- 1 tablespoon unsweetened cocoa powder
- 1/4 teaspoon baking powder
- 1/8 teaspoon salt
- 6 tablespoons (85g) unsalted butter, softened
- 3/4 cup (150g) granulated sugar
- 1 large egg
- 1 teaspoon vanilla extract
- 1 tablespoon buttermilk
- 1 1/2 teaspoons red food coloring (liquid or gel)
For the Cream Cheese Filling:
- 4 ounces (115g) cream cheese, softened
- 3 tablespoons unsalted butter, softened
- 1 cup (120g) powdered sugar, sifted
- 1/2 teaspoon vanilla extract
Time Needed
You’ll need about 20 minutes to prepare the dough and filling, 10-12 minutes to bake the cookies, plus time to cool completely before filling and assembling. In total, plan for about 1 hour including cooling and assembly.
Step-by-Step Instructions:
1. Prepare Your Oven and Dry Ingredients
Preheat your oven to 350°F (175°C). Line a baking sheet with parchment paper or a silicone mat. In a medium bowl, whisk together the flour, cocoa powder, baking powder, and salt. Set this aside for now.
2. Mix the Cookie Dough
In a large bowl, beat the softened butter and granulated sugar with an electric mixer until the mixture is light and fluffy, usually about 3 to 4 minutes. Next, add the egg, vanilla extract, and red food coloring and mix until everything is well combined.
3. Combine Wet and Dry Ingredients
Add the dry ingredients and the buttermilk to the butter mixture alternately, starting and ending with the dry ingredients. Mix gently until just combined—be careful not to overmix.
4. Pipe the Rose Shapes
Fit a large piping bag with a closed-star tip (like Wilton 2D or Ateco 865) and fill it with the cookie dough. Pipe rose shapes onto your prepared baking sheet by starting at the center and swirling outward in a circular pattern to mimic rose petals. Make 14 cookies so you have pairs for sandwiching.
5. Bake and Cool the Cookies
Bake the cookies for 10-12 minutes or until they are just set but still soft. Let them cool completely on the baking sheet before moving them to a wire rack or plate.
6. Prepare the Cream Cheese Filling
While the cookies cool, beat together the softened cream cheese and butter until smooth. Gradually add the powdered sugar and vanilla extract, beating until the filling is fluffy and creamy.
7. Assemble the Cookies
Transfer the cream cheese filling to a piping bag fitted with a round or star tip. Pipe a generous dollop of filling onto the flat side of one cookie, then lightly press a second cookie on top to form a sandwich.
8. Serve or Store
Enjoy your rose sandwich cookies right away or chill them briefly to help the filling set. Store leftover cookies in an airtight container in the fridge for up to 3 days.
Can I Use Frozen Butter or Cream Cheese?
It’s best to use softened butter and cream cheese for the filling and dough, as this ensures a smooth mixture and better texture. If your butter or cream cheese is frozen, thaw it in the fridge overnight or at room temperature for about 30 minutes before using.
Can I Make These Cookies Ahead of Time?
Yes! You can bake the rose cookies a day in advance and store them in an airtight container at room temperature. Prepare the cream cheese filling the day you plan to assemble for the freshest taste and texture.
How Do I Store Leftover Cookies?
Keep leftover sandwich cookies in an airtight container in the refrigerator for up to 3 days. Bring them to room temperature before serving to enjoy the soft texture and creamy filling.
What If I Don’t Have a Piping Bag or Star Tip?
If you don’t have a piping bag or star tip, you can carefully shape the dough into small rounds with a spoon or your hands, but the rose shape won’t be as defined. Alternatively, try using a zip-top bag with a small corner snipped off for piping.