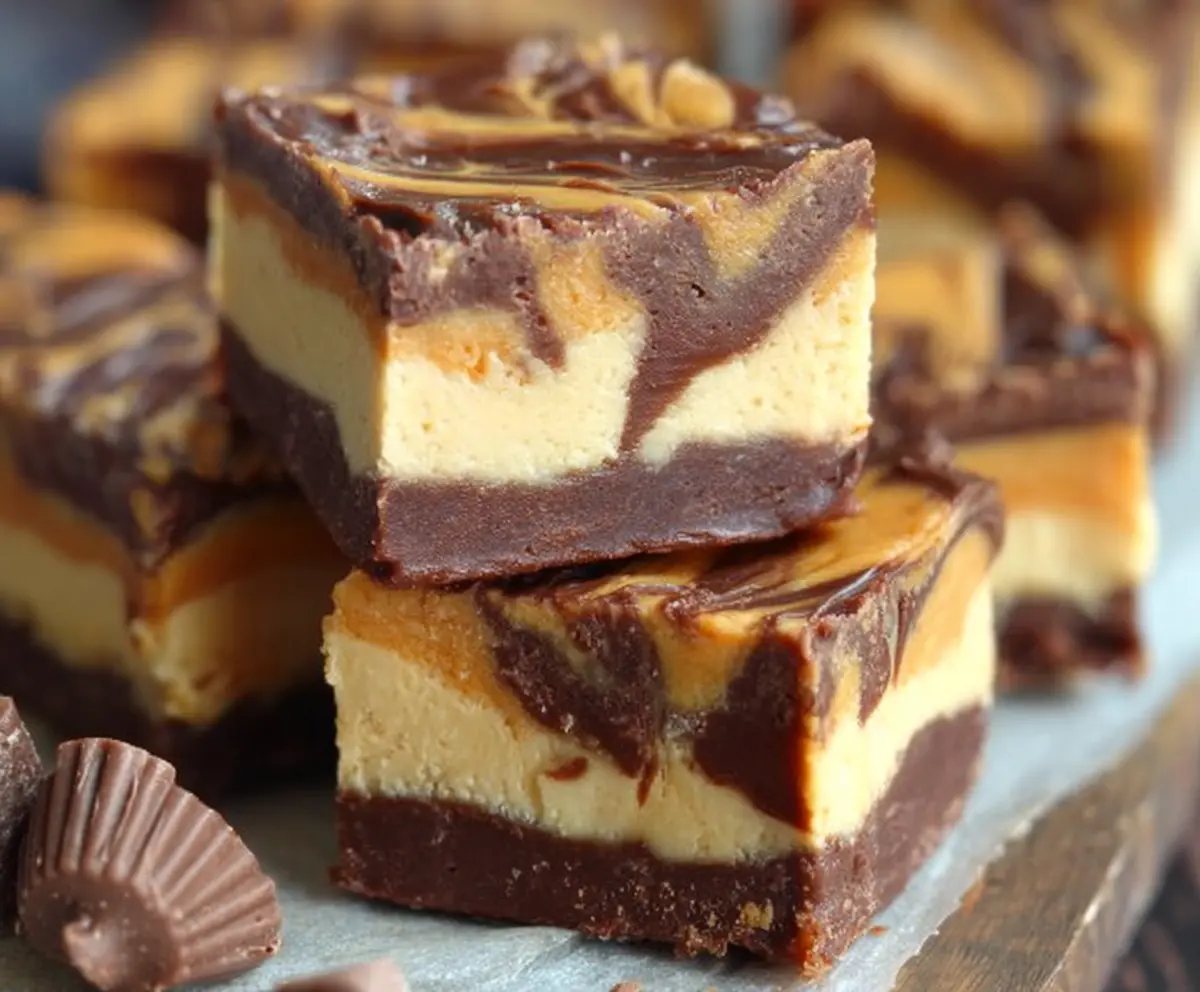
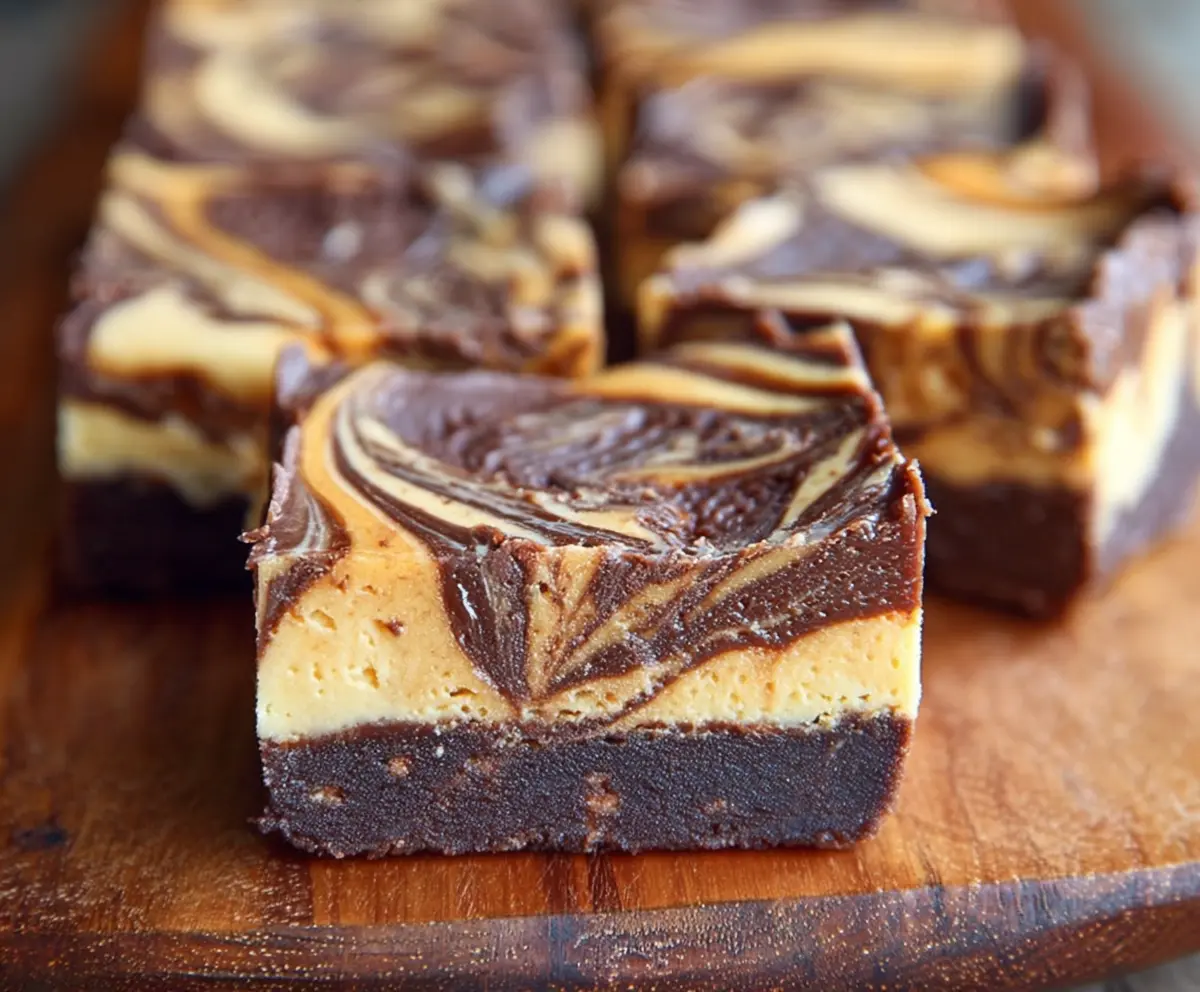
This Peanut Butter Cup Cheesecake Fudge is a delightful treat that brings together the creamy richness of cheesecake with the nutty goodness of peanut butter and the sweet surprise of peanut butter cups. It’s smooth, dense, and just the right amount of sweet, with little pockets of chocolate candy that melt in your mouth. If you love peanut butter and chocolate, this fudge is an easy way to enjoy both in one bite.
I love making this fudge when I want a special dessert that feels homemade but looks fancy enough to share with friends. The best part is how simple it is to whip up, yet it tastes like you spent hours in the kitchen. I usually sneak a few pieces just to make sure it’s perfect before anyone else tries it – it’s hard not to!
One of my favorite ways to serve this fudge is chilled right from the fridge, cut into small squares that fit perfectly in your hand. It’s a great snack to have around during the holidays or any time you need a little chocolate and peanut butter pick-me-up. Honestly, it’s the kind of treat that makes people ask for the recipe every time I bring it out.
Key Ingredients & Substitutions
Semi-sweet Chocolate Chips: These give the fudge its rich chocolate base. You can swap these for dark or milk chocolate chips depending on how sweet or bitter you want it. I like semi-sweet because it balances well with peanut butter.
Peanut Butter: Creamy peanut butter blends smoothly into the fudge. Natural peanut butter can work, but it may change the texture a bit since it’s oilier. Avoid chunky for a silky finish!
Cream Cheese: This creates the cheesecake layer’s creamy texture. Make sure it’s room temperature and softened; cold cream cheese can result in lumps.
Sweetened Condensed Milk: This adds sweetness and helps bind the fudge. Look for full-fat versions for the best texture. You can try evaporated milk with some sugar but it won’t be as rich.
Peanut Butter Cups: Adding mini or chopped peanut butter cups gives little bursts of chocolate and peanut butter delight in each bite. If you don’t have these, chopped Reese’s or similar candies work well.
How Do I Get That Beautiful Marbled Swirl on Top?
Creating the marble effect is easier than it looks! Here’s how:
- After layering the creamy peanut butter cheesecake mixture over the chocolate base, melt the remaining chocolate chips.
- Drizzle the melted chocolate evenly over the top.
- Use a butter knife or skewer to gently swirl the top in a figure-eight or circular motion. Avoid over-swiping so the layers stay distinct.
- This technique not only looks pretty but adds a nice chocolate touch with every bite!
Take your time swirling, and if you want, practice on parchment first. It’s a simple step that really makes your fudge look special!
Equipment You’ll Need
- 8×8 inch baking pan – I like it because it’s just the right size for a thick, easy-to-cut fudge.
- Parchment paper – makes it simple to lift the fudge out when it’s set.
- Microwave-safe bowl – for melting chocolate quickly and evenly.
- Mixing bowls – for beating the cream cheese mixture and blending ingredients.
- Spatula or spoon – helps spread and swirl the layers smoothly.
- Knife or pizza cutter – for cleanly cutting the fudge into squares after it’s chilled.
Flavor Variations & Add-Ins
- White chocolate chips – swap with dark or milk chocolate for different taste profiles.
- Chopped Reese’s or other candies – add extra texture and peanut butter bursts.
- Swirls of caramel or chocolate syrup – for a gooey, extra sweet touch.
- Sliced roasted peanuts – sprinkle on top for crunch and nutty flavor.
Peanut Butter Cup Cheesecake Fudge
Ingredients You’ll Need:
Fudge Layers:
- 2 cups semi-sweet chocolate chips
- 1 cup creamy peanut butter (divided)
- 1 (8 oz) package cream cheese, softened
- 1 (14 oz) can sweetened condensed milk
- 2 teaspoons vanilla extract
- ¼ teaspoon salt
- 1 cup mini peanut butter cups or chopped regular peanut butter cups
How Much Time Will You Need?
This recipe takes about 15 minutes to prepare and then needs at least 4 hours to chill and set properly in the refrigerator. It’s best to make it ahead so the fudge becomes firm and easy to cut.
Step-by-Step Instructions:
1. Prepare the Pan:
Line an 8×8 inch baking pan with parchment paper or grease it lightly. This will make it easy to remove the fudge once it’s set.
2. Make the Chocolate Peanut Butter Base:
In a microwave-safe bowl, melt 1½ cups of the semi-sweet chocolate chips in 30-second intervals. Stir between each interval until smooth. Stir in ½ cup of creamy peanut butter until fully combined. Spread this chocolate and peanut butter mixture evenly into the bottom of the prepared pan.
3. Prepare the Cheesecake Peanut Butter Layer:
In a separate bowl, beat the softened cream cheese, sweetened condensed milk, remaining ½ cup of peanut butter, vanilla extract, and salt until smooth and creamy. Fold in the mini or chopped peanut butter cups gently to keep them from breaking apart too much.
4. Assemble and Create the Marble Effect:
Pour the creamy cheesecake peanut butter mixture over the chocolate layer in the pan and spread gently to even it out. Melt the remaining ½ cup of chocolate chips and drizzle over the top. Use a knife or skewer to swirl the chocolate and cheesecake layers lightly to create a pretty marbled pattern.
5. Chill and Serve:
Place the pan in the refrigerator for at least 4 hours, or until the fudge is firm. When ready, lift the fudge out using the parchment paper and cut it into small squares. Keep the fudge stored chilled in an airtight container for best freshness.
This fudge is a perfect blend of rich chocolate, creamy peanut butter cheesecake, and bursts of peanut butter cups. It’s simple to make but sure to impress anyone you share it with. Enjoy every delicious bite!
Can I Use Natural Peanut Butter Instead of Creamy?
Yes, you can use natural peanut butter, but be aware it has more oil and a thinner consistency which might make the fudge slightly softer. Stir it well before measuring to keep the texture consistent.
How Should I Store Leftover Fudge?
Store the fudge in an airtight container in the refrigerator for up to one week. If you prefer it softer, let it sit at room temperature for a few minutes before serving.
Can I Make This Fudge Ahead of Time?
Absolutely! This fudge actually tastes better when it has time to set overnight. Just cover and refrigerate, then cut into squares before serving.
What Can I Substitute for Mini Peanut Butter Cups?
If you don’t have mini peanut butter cups, chopped regular peanut butter cups or peanut butter chip morsels work well. You could also use chopped Reese’s Pieces for a crunchy twist.