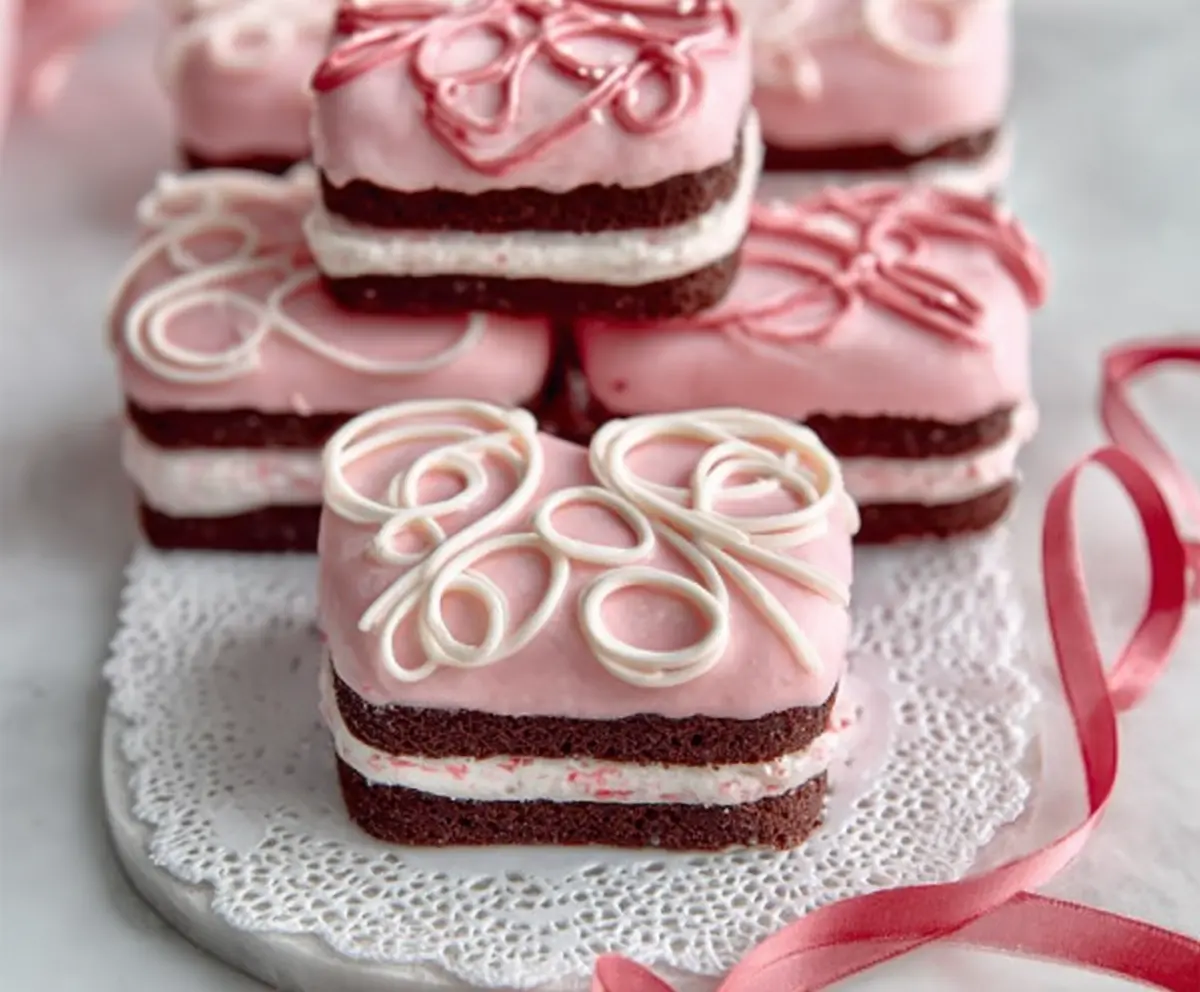
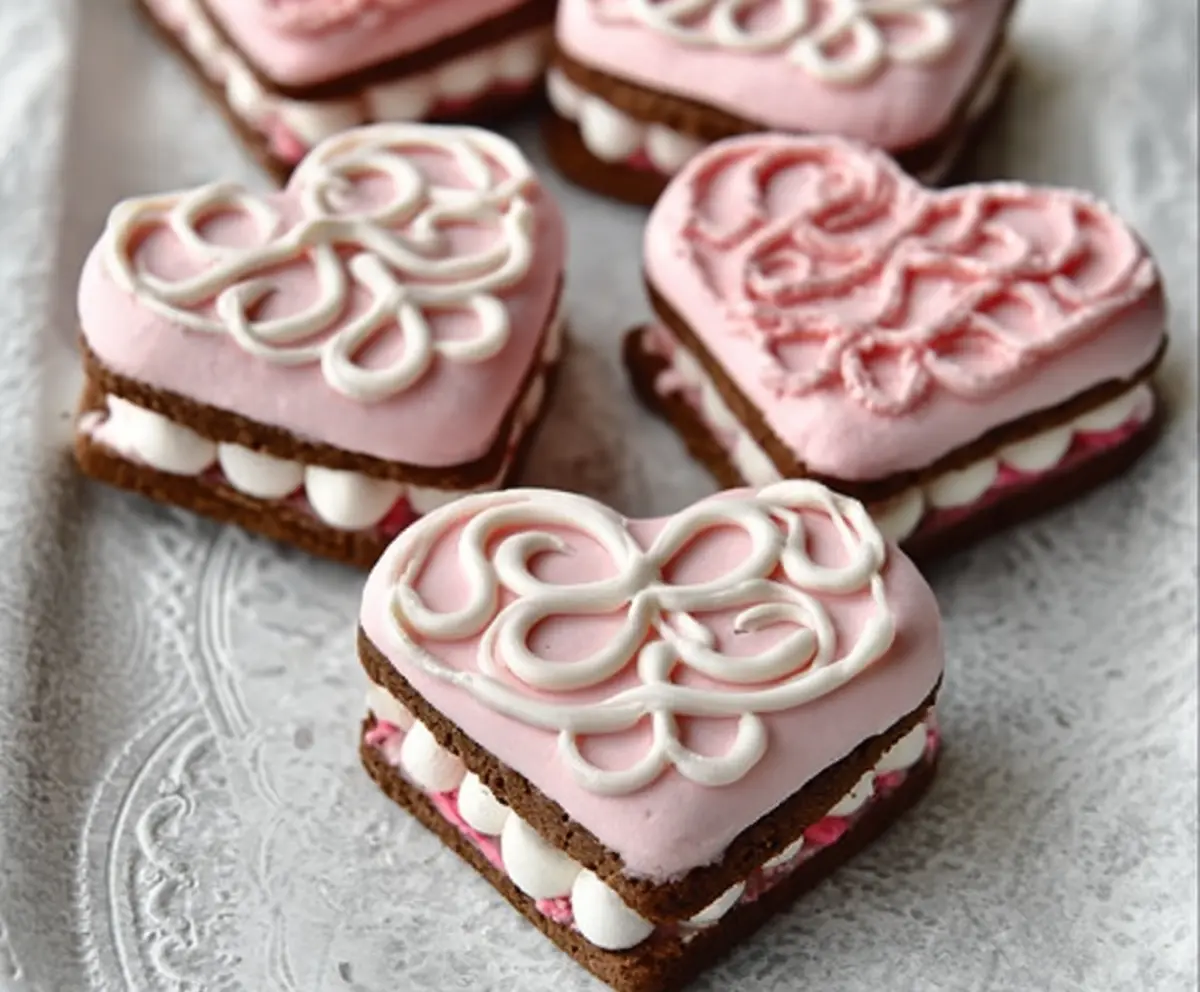
These Copycat Little Debbie Valentines Cakes are a sweet treat that brings all the fun and flavor of the classic store-bought snack right into your kitchen. Fluffy, moist cake layers combine with a thick, creamy pink filling and a smooth chocolate coating, creating that perfect mix of soft and rich textures that everyone loves.
I love making these when I want to surprise my family with something special but simple. The best part is that they’re just as delightful as the originals, but you get to enjoy fresh ingredients and can even add your own little twists if you want. I find it super fun to shape and decorate them with festive sprinkles to make them extra charming for Valentine’s Day or just to brighten up any day.
Serving these little cakes chilled makes them even better—the cream stays nice and cool, and the chocolate gets just the right snap. I like pairing them with a cold glass of milk or a cup of tea. No matter how you enjoy them, these homemade Valentines Cakes never fail to bring smiles and a bit of sweetest-of-sweets nostalgia to the table.
Key Ingredients & Substitutions
Chocolate Cake: The cocoa powder gives these cakes a rich chocolate flavor. If you don’t have buttermilk, mix 1/2 cup milk with 1/2 tsp lemon juice or vinegar and let it sit for 5 minutes—it works great as a substitute.
Peppermint Cream Filling: Cold heavy cream is key for a fluffy topping. If peppermint extract is too strong, start with less and adjust to taste. Crushed candy canes add crunch; you can skip them for a smooth filling or swap with finely chopped white chocolate.
Pink Icing: Butter adds creaminess, but margarine works in a pinch. The food coloring is for that cute Valentine’s pink. Use natural beet juice powder for a subtle color if you prefer no artificial dyes.
White Chocolate for Decoration: Melting white chocolate chips might feel tricky—use low heat or a double boiler to avoid burning. You can also use white candy melts or a simple icing made with powdered sugar and milk.
How Do You Get the Perfect Thin Cake Layers Without Breaking Them?
Slicing the cake horizontally can be tricky. Here’s how to nail it:
- Wait until the cake is completely cooled—it’s firmer and less likely to crumble.
- Use a long serrated knife or a cake leveler for an even cut.
- Place the cake on a cutting board, hold it steady, and use a gentle sawing motion rather than pressing down hard.
- If the slices still break, you can trim edges and press pieces together when assembling—the filling will help hold it all.
Taking your time with this step makes your layered treats look neat and professional, just like the ones in the store!
Equipment You’ll Need
- 9×9 inch baking pan – I recommend this size to get even, square cakes that are easy to slice and fill.
- Sifter or fine mesh strainer – helps you mix dry ingredients smoothly for a fluffy cake texture.
- Mixing bowls – different sizes make it easier to prepare the batter and the whipped cream.
- Whisk or electric hand mixer – I find an electric mixer makes whipping cream faster and fluffier.
- Sharp serrated knife – essential for slicing the cake into thin, even layers without breaking.
- Piping bag with a small round tip or a plastic sandwich bag – perfect for decorating with melted white chocolate or piping swirls.
- Double boiler or microwave-safe bowl – for melting the white chocolate smoothly without burning.
Flavor Variations & Add-Ins
- Use mint-flavored frosting instead of peppermint cream for a fresher taste, perfect for mint lovers.
- Swap the chocolate cake for vanilla or marble cake to change up the flavor but keep the adorable look.
- Mix in crushed cookies or sprinkles into the filling for extra texture and fun appearance.
- Decorate the tops with mini Valentine’s Day candies or edible glitter to make them extra festive.
Copycat Little Debbie Valentines Cakes
Ingredients You’ll Need:
For the Chocolate Cake Layers:
- 1 cup all-purpose flour
- 1/4 cup unsweetened cocoa powder
- 3/4 teaspoon baking powder
- 1/4 teaspoon baking soda
- 1/4 teaspoon salt
- 1/2 cup granulated sugar
- 1/4 cup vegetable oil
- 1/2 cup buttermilk
- 1 large egg
- 1 teaspoon vanilla extract
For the Peppermint Cream Filling:
- 1 cup heavy cream, cold
- 1/4 cup powdered sugar
- 1 teaspoon vanilla extract
- 1/4 teaspoon peppermint extract
- 1/3 cup crushed peppermint candies or candy canes
For the Pink Icing:
- 2 cups powdered sugar
- 2 tablespoons unsalted butter, softened
- 2-3 tablespoons whole milk or cream
- 1/2 teaspoon vanilla extract
- Red and white food coloring (to create pink color)
For the Chocolate Piping Decoration:
- 1/2 cup white chocolate chips, melted
How Much Time Will You Need?
This recipe takes about 15 minutes to prepare the batter and filling, 20-25 minutes to bake, plus cooling time. Then allow an additional hour for chilling after assembling and decorating so everything sets nicely. Overall, plan for about 2 hours from start to finish.
Step-by-Step Instructions:
1. Make the Chocolate Cake Layers:
Preheat your oven to 350°F (175°C). In a medium bowl, sift together the flour, cocoa powder, baking powder, baking soda, and salt. In a separate large bowl, whisk together sugar, oil, buttermilk, egg, and vanilla extract. Gradually add the dry ingredients to the wet mixture, stirring until smooth and well combined.
2. Bake the Cake:
Pour the batter into a greased or parchment-lined 9×9 inch baking pan and smooth the top. Bake for 20-25 minutes, or until a toothpick inserted in the center comes out clean. Remove from oven and let the cake cool completely before cutting.
3. Cut and Layer the Cake:
Once cooled, cut the cake into small squares about 2 x 2 inches. Carefully slice each square horizontally through the middle to create two thin cake layers per piece.
4. Prepare the Peppermint Cream Filling:
In a chilled bowl, whip the cold heavy cream until it starts to thicken. Add powdered sugar, vanilla extract, and peppermint extract, then whip until stiff peaks form. Gently fold in the crushed peppermint candies or candy canes.
5. Assemble the Cakes:
Spread a generous layer of peppermint cream filling on one cake layer and sandwich it with the other layer. Repeat this step for all your cake squares.
6. Make the Pink Icing:
Beat the powdered sugar and softened butter until smooth. Slowly add milk or cream, one tablespoon at a time, until the icing reaches a spreadable consistency. Mix in a few drops of red and white food coloring to create a soft pink color.
7. Ice the Cakes:
Spread a thick, even layer of the pink icing over the top of each sandwich cake.
8. Decorate:
Melt the white chocolate chips gently using a double boiler or microwave in short bursts. Transfer the melted chocolate to a piping bag fitted with a small round tip or a plastic bag with a tiny snip at one corner. Pipe decorative swirls and loops on top of the pink icing to mimic the original Valentine’s cakes.
9. Chill and Serve:
Refrigerate the cakes for about 1 hour to allow the icing to set and the filling to firm up. Serve chilled and enjoy your homemade Copycat Little Debbie Valentines Cakes!
Can I Use Frozen Cake Layers for This Recipe?
Yes! Just make sure to thaw them completely in the refrigerator before slicing and assembling. This prevents the cake from crumbling and helps the filling spread smoothly.
How Long Can I Store These Valentines Cakes?
Store the assembled cakes in an airtight container in the refrigerator for up to 3 days. For best texture and flavor, enjoy them within this timeframe.
Can I Substitute Peppermint Extract with Another Flavor?
Absolutely! You can use vanilla or almond extract for a different taste, or skip extracts altogether for a simple cream filling. Just adjust quantities to your preference.
What’s the Best Way to Melt White Chocolate Chips Without Burning?
Melt white chocolate slowly by using a double boiler or microwaving in short 15-20 second bursts, stirring frequently. This helps the chocolate melt evenly and prevents it from seizing or burning.